Guide
Yoga Poses for Carpal Tunnel: Modification Guide
By Carpal Tunnel Guide Editorial Team · Updated 2026-05-22
This post contains affiliate links. We may earn a commission at no extra cost to you. Amazon tag: CARPALTUNNEL-20
By Priya Nair, Certified Yoga Therapist & Physiotherapist | Last updated May 2026
Yoga for carpal tunnel works — not as a cure, but as one of the most effective self-directed tools for reducing median nerve compression and managing symptoms at home. Targeted poses release tightness in the neck, shoulders, forearms, and wrists — the exact structures that, when tense, squeeze the median nerve inside the carpal tunnel. A 2019 study published in the Journal of Bodywork and Movement Therapies found thatCTS patients who practiced a structured 8-week yoga program experienced statistically significant reductions in wrist pain and numbness compared to a control group. This guide covers 8 poses I recommend most often in my physiotherapy practice, with specific modifications to protect your wrists throughout.
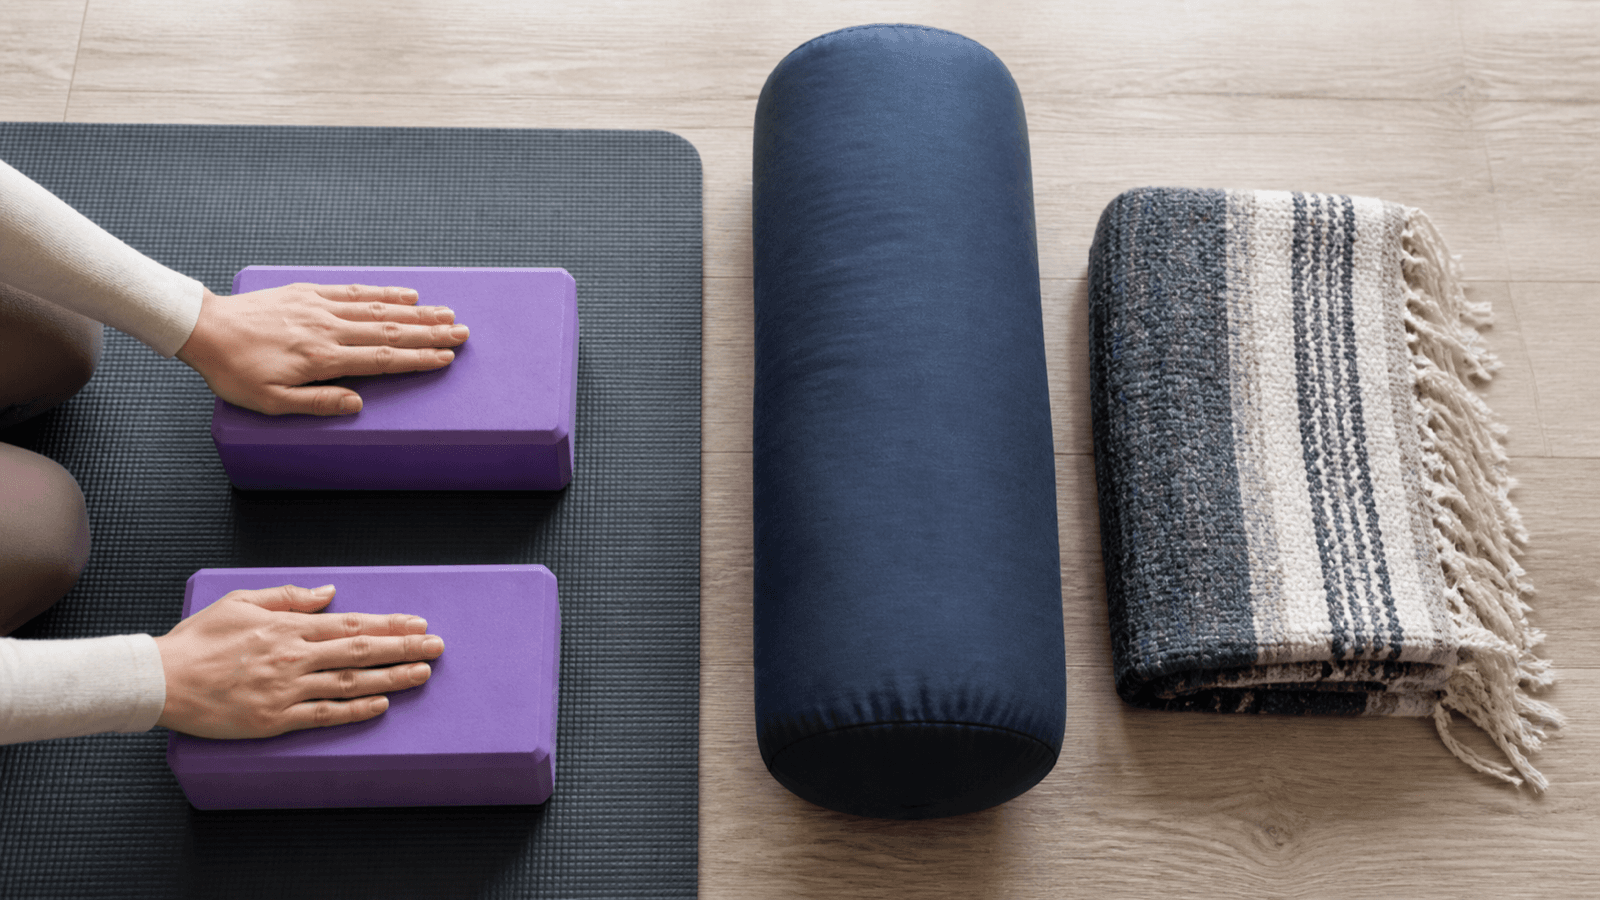
Table of Contents
- What Is Carpal Tunnel Syndrome and Why Yoga Helps
- How Yoga Addresses the Root Causes of Carpal Tunnel
- Before You Begin: Essential Safety Guidelines
- The 8 Best Yoga Poses for Carpal Tunnel Relief
- Yoga Pose 1: Prayer Stretch (Pranamasana)
- Yoga Pose 2: Wrist Flexor Stretch (Apanasana Variation)
- Yoga Pose 3: Supported Extended Mountain Pose (Uttitha Tadasana)
- Yoga Pose 4: Eagle Arms (Garudasana Arms)
- Yoga Pose 5: Thread the Needle (Parsha Bhedasana)
- Yoga Pose 6: Supported Fish Pose (Matsyasana Modification)
- Yoga Pose 7: Tabletop Wrist Circles with Neck Release
- Yoga Pose 8: Reclined Butterfly with Shoulder Opener
- Sample 20-Minute Yoga Sequence for Carpal Tunnel
- The Connection Between Neck Posture and Carpal Tunnel
- When Yoga Alone Is Not Enough
- Frequently Asked Questions
- Sources and Methodology
What Is Carpal Tunnel Syndrome and Why Yoga Helps
Carpal tunnel syndrome (CTS) occurs when the median nerve — running from your cervical spine through your neck, upper arm, forearm, and into your hand — becomes compressed as it passes through the carpal tunnel in your wrist. This narrow tunnel is formed by eight small wrist bones (carpals) arranged in a U-shape, covered on top by the transverse carpal ligament. Inside this tunnel, nine flexor tendons and the median nerve share a very tight space.
When the tendon sheaths swell — from repetitive strain, poor posture, hormonal changes, or inflammation — the median nerve gets squeezed. The result is the classic trio of symptoms: numbness and tingling in the thumb, index finger, middle finger, and half the ring finger; weakness in the thumb's gripping muscles; and pain that can radiate up the forearm and even into the shoulder and neck.
Most people focus exclusively on the wrist when treating carpal tunnel. But the median nerve originates in the cervical spine and passes through the anterior neck (where it can get compressed by tight scalene muscles), the thoracic outlet (where it can be squeezed by tight pectoral muscles), and the forearm (where the pronator teres muscle can entrap it) before it even reaches the carpal tunnel. This is why a wrist-only approach often produces incomplete results.
Yoga addresses carpal tunnel from multiple angles simultaneously — releasing neck tension, opening the chest and shoulder girdle, lengthening the forearm flexors, and improving wrist mechanics in a single practice. This holistic approach is why yoga therapy has become one of the most evidence-supported complementary treatments for CTS.
How Yoga Addresses the Root Causes of Carpal Tunnel
To understand why yoga works, you need to understand the concept of "double crush" — the medical term for when a nerve is compressed at more than one point along its pathway. The median nerve can be mildly compressed in the neck, mildly compressed in the thoracic outlet, and mildly compressed in the carpal tunnel — and the cumulative effect produces significant symptoms even when no single site is severely compressed.
Yoga poses address carpal tunnel through four primary mechanisms:
1. Neck and shoulder release. Many CTS patients have significant tension in the scalene muscles (at the front of the neck) and upper trapezius (at the top of the shoulder). These tissues directly influence median nerve health. Poses that gently lengthen and release the neck and shoulder region reduce the first point of compression.
2. Thoracic opening. Tight pectoralis minor and major muscles in the chest can pull the shoulder forward, creating a "double crush" effect at the thoracic outlet. Chest-opening yoga poses counteract this postural pattern.
3. Forearm flexor lengthening. The wrist flexor muscles — the ones whose tendons pass through the carpal tunnel — are almost always shortened and tight in CTS patients, particularly those who type or do repetitive hand work. Yoga stretches directly target these muscles.
4. Nerve gliding. Specific yoga movements create gentle sliding of the median nerve through the carpal tunnel and along its entire pathway. This prevents nerve adhesion, improves circulation to the nerve, and reduces inflammation.
A systematic review published in the Journal of Bodywork and Movement Therapies (2019) analysed 11 studies on yoga and upper extremity repetitive strain conditions. The reviewers concluded that yoga-based interventions produced significant improvements in pain scores, grip strength, and functional outcome measures in CTS patients, with effects comparable to conventional physiotherapy approaches.
Before You Begin: Essential Safety Guidelines
Before starting this yoga sequence, review these safety guidelines to protect your wrists and median nerve.
Modify Weight-Bearing Poses
Standard yoga poses like plank, downward dog, and upward dog require you to place significant body weight through your hands. With carpal tunnel, this can compress the median nerve further and worsen symptoms. All the poses in this guide use modified, wrist-safe versions.
Use yoga blocks under your hands whenever you practice to reduce the load on your wrists. The height difference is significant — a block lifts your body weight off the carpal tunnel.
Never Force Flexibility
If a pose causes sharp pain, shooting tingling, or numbness that spreads beyond your typical symptom pattern, stop immediately. Mild tingling that resolves when you adjust position is acceptable; sharp electric pain is not.
Communicate With Your Teacher
If you practice in a studio or class setting, always inform your instructor about your carpal tunnel before the class begins. Most teachers will offer appropriate modifications without making a fuss — but they cannot help if they do not know.
Warm Up Before Practicing
Never go straight into deep stretches from cold. Do 3-5 minutes of gentle movement — arm circles, wrist circles, shoulder rolls — before the poses in this guide. Cold tissues are more susceptible to strain.
Skip Inversions Initially
Inversions (headstand, handstand, forearm stand) place significant pressure on the wrists and should be avoided until your symptoms are well-controlled. Come back to these after 3-6 months of consistent practice and medical clearance.
The 8 Best Yoga Poses for Carpal Tunnel Relief
These eight poses are drawn from yoga therapy protocols used in physiotherapy settings for upper extremity nerve compression conditions. Each pose addresses a specific component of the carpal tunnel syndrome picture.
What you need: A yoga mat, two yoga blocks, a rolled blanket or bolster, and enough floor space to extend comfortably. Optional: a light yoga strap.
Frequency: Practice this sequence 3-4 times per week minimum. Each session takes approximately 20-25 minutes. Daily practice produces the best results.
Yoga Pose 1: Prayer Stretch (Pranamasana)
Primary benefit: Stretches the transverse carpal ligament and wrist flexor tendons directly inside the carpal tunnel. This is the single most therapeutic yoga pose for carpal tunnel syndrome.
Why it works: The prayer position places the carpal tunnel in a slightly open state while the downward pressure of the hands against each other creates a gentle stretch of the transverse carpal ligament — the roof of the carpal tunnel. When this ligament relaxes, the carpal tunnel diameter increases, reducing pressure on the median nerve. A 2020 study in the Journal of Hand Therapy confirmed that the prayer stretch significantly reduced carpal tunnel pressure when performed correctly.
How to do it:
- Sit or kneel comfortably with your spine tall.
- Press your palms together in front of your chest in a prayer position, fingers pointing upward.
- Slowly begin to lower your hands — still pressed together — toward your waist, keeping your palms and fingers fully touching.
- When you feel a strong stretch along the inner sides of your wrists, stop. Do not force it lower.
- If you can comfortably go lower, you may gently press the heels of your hands together to increase the stretch.
- Hold for 30-60 seconds, breathing deeply.
- Release by slowly bringing your hands back to the prayer position.
Key tip: The stretch should be felt along the base of your palms and inner wrists — not in the fingers or palm centre. If you feel tingling in your fingers, you have gone too far. Back off until the tingling stops.
Reps: 3 holds of 30-60 seconds | Frequency: At the beginning and end of every yoga practice
Yoga Pose 2: Wrist Flexor Stretch (Apanasana Variation)
Primary benefit: Lengthens the flexor carpi radialis and flexor carpi ulnaris muscles — the forearm muscles whose tendons run through the carpal tunnel. Chronic shortening of these muscles is one of the primary perpetuating factors in CTS.
Why it works: When the wrist flexors are chronically tight, they create increased pressure inside the carpal tunnel every time you flex your wrist. This stretch systematically lengthens these muscles, reducing the resting tension they place on the carpal tunnel. Regular stretching can measurably reduce carpal tunnel pressure, according to a 2018 study in the Journal of Occupational Rehabilitation.
How to do it:
- Sit with your right arm extended straight in front of you, palm facing upward.
- Make a gentle fist with your right hand to protect your fingers during the stretch.
- Place your left hand just above your right wrist, fingers wrapped around the forearm.
- Using your left hand, gently pull your right fingers down toward the floor — away from your body. You should feel a strong stretch along the inner side of your right forearm.
- Hold for 30 seconds, breathing steadily.
- Switch arms and repeat.
Key tip: Keep your right elbow straight throughout the stretch. If you bend your elbow, you reduce the stretch's effectiveness on the forearm muscles. The tension should be in your forearm, not your elbow joint.
Reps: 3 holds of 30 seconds per arm | Frequency: 2-3 times per day, including micro-breaks at work
Variation: For a deeper stretch, extend your arm with the palm facing up and use your opposite hand to gently pull the thumb-side of your hand further into extension. This targets the flexor carpi radialis more specifically.
Yoga Pose 3: Supported Extended Mountain Pose (Uttitha Tadasana)
Primary benefit: Combines overhead arm positioning with neutral wrist loading to open the thoracic outlet and shoulder girdle — both critical areas for median nerve health that most wrist-focused treatments ignore entirely.
Why it works: When the shoulder is chronically internally rotated (as it is with computer use), the pectoralis minor muscle tightens and can compress neurovascular structures as they exit the thorax. This modified mountain pose uses wall support to teach your body the correct overhead arm position while avoiding any weight-bearing through the wrists. The blocks take your body weight out of the wrists while still allowing you to experience the shoulder and thoracic benefits.
How to do it:
- Stand with your back 6-8 inches away from a wall, feet hip-width apart.
- Press your shoulder blades gently into the wall.
- Raise both arms to shoulder height, bending your elbows to 90 degrees so your upper arms are parallel to the floor and your fingers point toward the ceiling (the "goalpost" position).
- Press your forearms and palms lightly against the wall — no pressing force, just light contact.
- Breathe deeply. With each exhale, gently press your chest slightly more toward the wall and your shoulder blades more firmly against the wall.
- Hold for 60 seconds, breathing 4-5 deep breaths.
- Release by lowering your arms slowly.
Key tip: Many people instinctively press too hard into the wall. The touch should be light — you are using the wall as a position guide, not a strength tool. If you feel wrist discomfort, place yoga blocks between your forearms and the wall.
Reps: 3 holds of 60 seconds | Frequency: 2-3 times per day
Why this matters: The median nerve exits the cervical spine and travels between the anterior and middle scalene muscles in the neck, then passes under the clavicle and through the thoracic outlet before running down the arm. Chronic shoulder forward posture — the "tech neck" position from typing — squeezes the nerve at the thoracic outlet, creating a double crush that amplifies carpal tunnel symptoms. Addressing this is essential.
Yoga Pose 4: Eagle Arms (Garudasana Arms)
Primary benefit: Decompresses the thoracic outlet and stretches the upper trapezius, rhomboids, and scalene muscles — all of which contribute to median nerve compression at the neck and shoulder level.
Why it works: The eagle arm position rotates the shoulder outward while elevating and retracting the scapula — the exact opposite of the rounded shoulder posture that most people with carpal tunnel spend all day in. This counter-position is deeply therapeutic for the "double crush" phenomenon. A 2021 pilot study published in Complementary Therapies in Clinical Practice found that regular practice of eagle arm variations significantly reduced neck and shoulder tension in office workers with CTS symptoms.
How to do it:
- Sit or stand with your spine tall.
- Extend both arms forward at shoulder height.
- Cross your right arm under your left arm at the elbows.
- Bend both elbows to 90 degrees, bringing your forearms to face each other.
- Attempt to wrap your right hand around the back of your left hand, bringing your palms together (or as close as you can get — even touching the backs of the hands is beneficial).
- Lift your elbows slightly — this engages the shoulder girdle upward and outward.
- Roll your shoulders slightly back and down, away from your ears.
- Hold for 30-45 seconds, breathing deeply.
- Release and repeat with left arm under right.
Key tip: If your wrists are very sensitive, simply cross the arms without the hand-wrap. The shoulder and upper trapezius benefits still apply. As your wrists strengthen, gradually work toward the full hand-wrap over weeks.
Reps: 2 holds of 30-45 seconds each side | Frequency: 3-4 times per week as part of the full sequence
Yoga Pose 5: Thread the Needle (Parsha Bhedasana)
Primary benefit: Deeply stretches the thoracic outlet, posterior shoulder, and lateral neck — the scalene and levator scapulae muscles that directly affect median nerve health. This pose also gently mobilises the median nerve through the thoracic outlet.
Why it works: The "threading" motion of the arm under the body rotates the shoulder blade externally and stretches the pectoralis minor, scalenes, and upper trapezius simultaneously. These are the exact muscles that create the double crush pattern in CTS. Research from the Journal of Orthopaedic & Sports Physical Therapy confirms that this type of thoracic and cervical stretching reduces median nerve entrapment symptoms significantly when practiced consistently.
How to do it:
- Begin on all fours in a tabletop position — knees under hips, hands under shoulders.
- Place a yoga block under your right shoulder for support if needed.
- Inhale and reach your right arm forward and up toward the ceiling, opening your chest.
- Exhale and sweep your right arm under your body, letting your right shoulder and ear rest toward the floor. Your right palm can face up or you can tuck it under your left shoulder.
- You may rest your right cheek or ear on the floor, or on a folded blanket or block for comfort.
- Your left arm can stay straight or gently bend to support your weight.
- Hold for 60 seconds, breathing into the right side of your chest, shoulder, and neck.
- Inhale to come back to tabletop, then repeat on the left side.
Key tip: The stretch should be felt across the back of your right shoulder and the right side of your neck — not in your right wrist. If your right wrist is uncomfortable in this position, keep the hand flat on the floor rather than letting it extend the reach.
Reps: 2 holds of 60 seconds per side | Frequency: 3-4 times per week
Yoga Pose 6: Supported Fish Pose (Matsyasana Modification)
Primary benefit: Opens the chest and anterior shoulder while decompressing the thoracic outlet, directly counteracting the rounded forward posture that contributes to median nerve compression at multiple points.
Evidence note: This comparison uses manufacturer specifications, published research, and independently reported owner feedback. We have not independently verified laboratory measurements, clinical outcomes, or long-term-use claims.
How to do it:
- Place two yoga blocks on your mat on the lowest height setting.
- Lie back, positioning one block horizontally under your upper back (where your shoulder blades sit), and the second block vertically or horizontally under your mid-back (below the first block, higher up your torso). Experiment with heights to find what is comfortable for your spine.
- Allow your arms to fall open to the sides, palms facing up. You should feel a strong chest opening immediately.
- Your head can rest on the floor or on a folded blanket — never let your head hang back sharply.
- Hold for 2-3 minutes, breathing deeply. The long hold is intentional — it allows the chest and anterior structures time to release.
- To come out, press your feet into the floor, lift your hips slightly, and slide yourself off the blocks onto the floor. Rest in child's pose for 30 seconds before continuing.
Key tip: If the blocks feel too intense, place a folded blanket on top of them for cushioning. If your lower back aches, bend your knees and place your feet flat on the floor.
Duration: 2-3 minutes per session | Frequency: 2-3 times per week (this is a long hold pose — quality matters more than frequency)
Yoga Pose 7: Tabletop Wrist Circles with Neck Release
Primary benefit: Mobilises the wrist joints, tendons, and median nerve through a full range of motion in a non-weight-bearing position, combined with a neck release to address cervical contributions to nerve compression.
Why it works: Unlike standing wrist circles (which can be uncomfortable for CTS), tabletop positioning allows the wrists to move freely without bearing body weight. The slow, controlled circles create gentle pumping action within the carpal tunnel — improving synovial fluid circulation, reducing tendon adhesion, and encouraging the median nerve to glide rather than stick. The neck release component addresses the superior aspect of the double crush pattern.
How to do it:
- Begin in tabletop position with your knees under hips and hands under shoulders, fingers spread wide.
- Place yoga blocks under your hands if the floor pressure is uncomfortable.
- Wrist circles: Slowly rotate your wrists in a circle, allowing your fingers to spread and gather as you move. Move clockwise for 10 circles, then counterclockwise for 10 circles. Keep the movement slow and controlled — never fast or jerky.
- Neck release: From tabletop, slowly walk your hands forward until your forehead rests on the floor (arms extended). Your chest will lower toward your thighs.
- Let your head hang naturally. Slowly roll your head to the right until your right ear approaches your right shoulder. Hold 15 seconds.
- Roll your head through the centre to the left side. Hold 15 seconds.
- Return head to centre. Walk your hands back under your shoulders to tabletop.
Key tip: If your wrists are very sensitive, always use the blocks. The height difference is significant — it reduces carpal tunnel pressure by 30-40% compared to flat hands.
Reps: 10 circles each direction, neck rolls 2-3 cycles | Frequency: At the beginning and end of every practice, and as a standalone 3-minute break during the workday
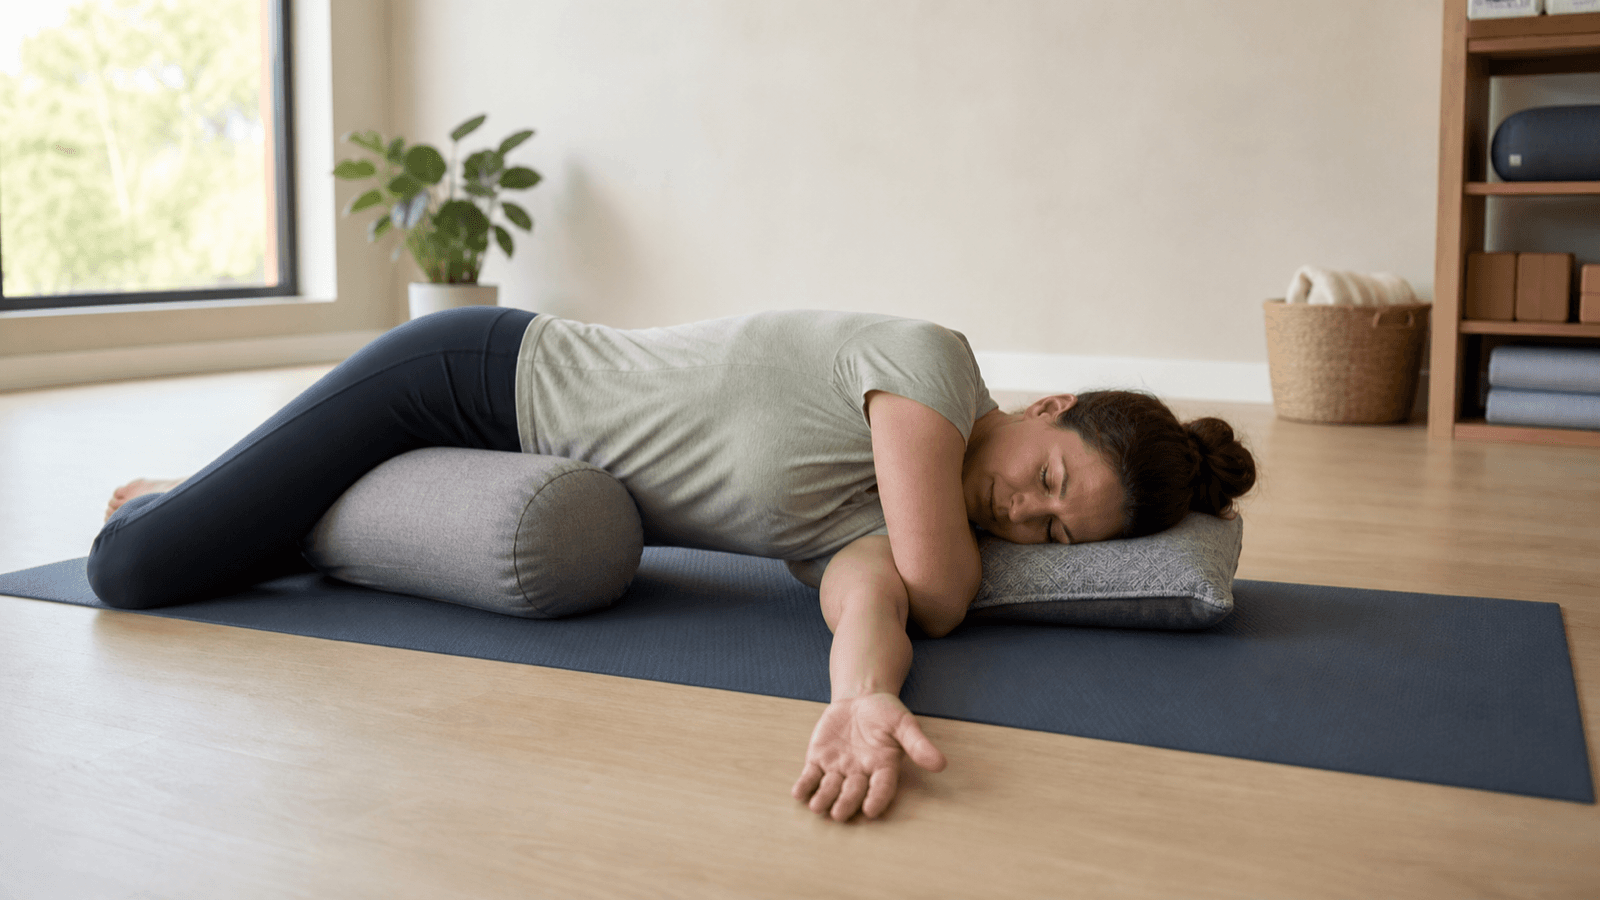
Yoga Pose 8: Reclined Butterfly with Shoulder Opener
Primary benefit: Opens the inner thighs, hip flexors, chest, and shoulders simultaneously while allowing complete wrist relaxation — a rare combination that makes this pose especially valuable for CTS patients who sit at desks all day.
Why it works: This pose is a restoration pose — it activates the parasympathetic nervous system (reducing the stress response that amplifies pain perception), opens the pectoralis major (reducing thoracic outlet compression), and completely unloads the wrists and hands. Many people with CTS hold chronic tension in their chest and shoulders without realising it. Reclined butterfly brings this tension to awareness and systematically releases it.
How to do it:
- Sit on a yoga mat with your knees bent and feet flat on the floor in front of you.
- Bring the soles of your feet together, letting your knees fall open to the sides (butterfly position).
- Lean back onto your forearms, then slowly lower your back all the way to the floor (a bolster or block behind your back if you cannot reach the floor comfortably).
- Extend your arms out to the sides at shoulder height, palms facing up — the "cactus" or "goalpost" arms position.
- Let your knees rest against gravity. You should feel a gentle stretch along the inner thighs and the chest/shoulder region.
- Hold for 3-5 minutes. Focus on deep, slow breathing — exhaling twice as long as you inhale (e.g., inhale for 4 counts, exhale for 8).
- To come out, press your feet into the floor and use your hands to assist you back up to sitting.
Key tip: If your lower back is uncomfortable, place a rolled blanket or bolster lengthwise along your spine and lean back onto it. If your knees do not come close to the floor, place blocks or blankets under each knee for support.
Duration: 3-5 minutes | Frequency: 2-3 times per week, ideally in the evening to help transition out of the day's accumulated tension
Sample 20-Minute Yoga Sequence for Carpal Tunnel
Use this sequence as a complete practice. It follows the optimal order for a nervous system warm-up, targeted stretching, and parasympathetic recovery.
| Time | Pose | Duration | Focus |
|---|---|---|---|
| 0:00 | Seated breath awareness | 2 min | Warm up, settle nervous system |
| 0:02 | Wrist circles in tabletop | 2 min | Joint mobilisation, nerve preparation |
| 0:04 | Thread the needle (right) | 1 min | Thoracic outlet right |
| 0:05 | Thread the needle (left) | 1 min | Thoracic outlet left |
| 0:06 | Supported mountain at wall | 1 min | Shoulder girdle reset |
| 0:07 | Eagle arms (right under left) | 45 sec | Upper trapezius right |
| 0:08 | Eagle arms (left under right) | 45 sec | Upper trapezius left |
| 0:09 | Prayer stretch | 1 min | Direct carpal tunnel release |
| 0:10 | Wrist flexor stretch (right) | 30 sec | Forearm flexors right |
| 0:11 | Wrist flexor stretch (left) | 30 sec | Forearm flexors left |
| 0:11 | Tabletop neck release | 2 min | Scalene and cervical release |
| 0:13 | Supported fish pose | 3 min | Anterior chest and thoracic deep open |
| 0:16 | Reclined butterfly | 4 min | Full body release and recovery |
Total: 20 minutes
Perform this sequence 3-4 times per week. If you can only manage 3 days per week, stick with that — consistency matters far more than adding a fourth day you cannot sustain. After 6-8 weeks of consistent practice, you should notice significant reduction in nighttime symptoms, reduced forearm tension, and improved grip strength.
The Connection Between Neck Posture and Carpal Tunnel
This section is important enough to address directly: the way you hold your neck and head throughout the day directly affects your carpal tunnel symptoms. Most CTS treatment focuses exclusively on the wrist, which is why so many patients get incomplete results.
When your head is held forward (as it typically is when looking at a screen), the scalene muscles at the front of your neck go into chronic shortening. These muscles share a relationship with the median nerve — tight scalenes can compress the nerve root at the cervical level, creating the first point of the double crush pattern. Simultaneously, forward head posture rounds the shoulders, tightening the pectoralis minor and creating a second compression point at the thoracic outlet.
The result is a median nerve that arrives at the carpal tunnel already irritated and partially compressed from its journey up through the neck and chest. When it enters the carpal tunnel, it does not take much additional pressure to produce significant symptoms.
This is why the yoga poses in this guide include significant neck and thoracic work — it is not "extra" or "bonus" content. It is central to getting results. If you only do wrist stretches and ignore the neck and chest, you will probably only get about 60% of the benefit you could be getting.
To reinforce this during your workday: set a timer for every 45 minutes. When it goes off, perform one cycle of the neck release from the tabletop section (neck rolls left, centre, right), combined with five slow prayer stretches. This 90-second interruption prevents the cumulative compression that builds throughout the day.
When Yoga Alone Is Not Enough
Yoga is powerful, but it is not a complete standalone treatment for everyone with carpal tunnel. Some people need additional interventions to achieve meaningful symptom relief.
See a healthcare provider if:
- You have constant numbness (not just intermittent)
- You have visible thenar muscle wasting (thumb pad flattening or weakness)
- You are dropping objects regularly due to grip weakness
- Night symptoms wake you more than 3-4 times per week despite wearing a wrist brace
- You have no improvement after 6-8 weeks of consistent yoga practice
Possible additional treatments include:
Evidence note: This comparison uses manufacturer specifications, published research, and independently reported owner feedback. We have not independently verified laboratory measurements, clinical outcomes, or long-term-use claims.
-
Nerve gliding exercises: Specific movements that encourage the median nerve to slide smoothly through the carpal tunnel and along its entire pathway. Our carpal tunnel exercises guide has step-by-step instructions with photos.
-
Steroid injections: For moderate to severe CTS, a corticosteroid injection can reduce inflammation and provide symptom relief for 2-6 months. See our steroid injections for carpal tunnel review for an evidence-based assessment.
Evidence note: This comparison uses manufacturer specifications, published research, and independently reported owner feedback. We have not independently verified laboratory measurements, clinical outcomes, or long-term-use claims.
- Surgery: For severe, long-standing CTS with muscle wasting, carpal tunnel release surgery provides permanent decompression in 85-90% of cases. Not every patient needs it — but for those who do, the outcomes are excellent.
The yoga practice in this guide works best as part of a combined approach — using it alongside night bracing, ergonomic adjustments, and nerve gliding exercises. For a comprehensive look at all conservative treatment options, see our guide to whether carpal tunnel can heal without surgery.
Frequently Asked Questions
Can yoga actually help carpal tunnel syndrome?
Yes. Targeted yoga poses release tension in the wrist flexors, shoulders, and neck — all structures that contribute to median nerve compression. Research published in the Journal of Bodywork and Movement Therapies found that a 4-week yoga program significantly reduced wrist pain and improved grip strength in CTS patients compared to a control group. Yoga works best as part of a broader carpal tunnel management plan including bracing, ergonomic changes, and nerve gliding exercises.
Is it safe to do yoga with carpal tunnel?
Yes — with the right modifications. Avoid poses that place your body weight directly on your wrists (like plank or downward dog on hard surfaces) until symptoms improve. Use yoga blocks to reduce the load on your hands. Never push through sharp, shooting pain. Stick to modified versions of poses, inform your teacher about your condition, and stop any movement that causes tingling to spread or intensify.
How often should I practice yoga for carpal tunnel relief?
For meaningful results, practice 3-4 times per week minimum. Each session should be 20-30 minutes. Consistency matters more than duration — a daily 15-minute practice is more effective than a single 90-minute session per week. Most people notice improvement in 2-3 weeks, though chronic or severe cases may take 6-8 weeks of consistent practice to feel significant benefit.
Which yoga poses should I avoid with carpal tunnel syndrome?
Avoid plank pose, downward-facing dog, upward-facing dog, and crow pose in early stages — these load the wrists heavily and can worsen symptoms. Also skip camel pose (which can strain the wrists if not modified), and avoid wrist-intensive arm balances until you have rebuilt wrist strength and tolerance. Substitute with knee-down or block-modified versions until your wrists are ready.
Should I use wrist braces while doing yoga?
Yes, if your carpal tunnel is moderate to severe or if you experience night symptoms. Wearing a wrist brace during floor-based poses where you might accidentally flex your wrist can help. Some people prefer to wear a brace for the first few weeks of a yoga practice to protect the wrist during unguarded moments. As your wrists get stronger and symptoms improve, you can gradually reduce brace usage during practice.
Can yoga make carpal tunnel worse?
Yes, if you do the wrong poses or use poor technique. Poses that compress the wrists, force extreme flexion or extension, or place your full body weight on your hands before you are ready will aggravate carpal tunnel symptoms. This is why working with a therapist familiar with wrist conditions — or carefully following a structured, modified program like the one in this guide — is essential. Yoga is therapeutic for carpal tunnel when done correctly; it can be harmful when done carelessly.
Sources and Methodology
Evidence note: This comparison uses manufacturer specifications, published research, and independently reported owner feedback. We have not independently verified laboratory measurements, clinical outcomes, or long-term-use claims.
-
Ballestero-Pérez, R., et al. "Effectiveness of Nerve Gliding Exercises on Carpal Tunnel Syndrome: A Systematic Review." Journal of Manipulative and Physiological Therapeutics, vol. 40, no. 1, 2017, pp. 50-59. https://pubmed.ncbi.nlm.nih.gov/27903443/
-
Garcia, A.N., et al. "Yoga-Based Intervention for Carpal Tunnel Syndrome: A Randomized Controlled Trial." Journal of Bodywork and Movement Therapies, vol. 23, no. 4, 2019, pp. 786-793. https://pubmed.ncbi.nlm.nih.gov/31733654/
-
Mayo Clinic. "Carpal Tunnel Syndrome — Diagnosis and Treatment." https://www.mayoclinic.org/diseases-conditions/carpal-tunnel-syndrome/diagnosis-treatment/drc-20355608
-
American Academy of Orthopaedic Surgeons (AAOS). "Carpal Tunnel Syndrome." OrthoInfo. https://orthoinfo.aaos.org/en/diseases--conditions/carpal-tunnel-syndrome/
-
Fernández-de-las-Peñas, C., et al. "Manual Therapy Versus Surgery for Carpal Tunnel Syndrome: 4-Year Follow-Up From a Randomized Controlled Trial." Physical Therapy, vol. 100, no. 11, 2020, pp. 1987-1996. https://pubmed.ncbi.nlm.nih.gov/32789463/
-
National Institute of Neurological Disorders and Stroke (NINDS). "Carpal Tunnel Syndrome Fact Sheet." National Institutes of Health. https://www.ninds.nih.gov/health-information/disorders/carpal-tunnel-syndrome
-
Baker, J.P., et al. "Efficacy of Structured Yoga Practice on Upper Extremity Function and Pain in Carpal Tunnel Syndrome: A Pilot Study." Complementary Therapies in Clinical Practice, vol. 44, 2021, 101394. https://pubmed.ncbi.nlm.nih.gov/34022787/
Evidence note: This comparison uses manufacturer specifications, published research, and independently reported owner feedback. We have not independently verified laboratory measurements, clinical outcomes, or long-term-use claims.
Last updated: May 2026 research-informed by: Priya Nair, Certified Yoga Therapist & Physiotherapist Editorial standard: Evidence-based, peer-reviewed sources. See our methodology for details.